B-17 Enclosed Home Cockpit Project
-
Lewis - A2A

- A2A Lieutenant Colonel
- Posts: 33318
- Joined: 06 Nov 2004, 23:22
- Location: Norfolk UK
- Contact:
Re: B-17 Enclosed Home Cockpit Project
Amazing work going into it and its really loooking like its paying off. It just looks out of this world 
A2A Facebook for news live to your social media newsfeed
A2A Youtube because a video can say a thousand screenshots,..
A2A Simulations Twitter for news live to your social media newsfeed
A2A Simulations Community Discord for voice/text chat
A2A Youtube because a video can say a thousand screenshots,..
A2A Simulations Twitter for news live to your social media newsfeed
A2A Simulations Community Discord for voice/text chat
-
Snuffy
- Senior Master Sergeant
- Posts: 2102
- Joined: 18 May 2004, 08:05
- Location: The Good ol U.S. of A.
Re: B-17 Enclosed Home Cockpit Project
<tongue in cheek> What I wanna know is ....
When did they start installing wall to wall carpeting in B-17 Cockpits??!!??

<tongue in cheek>
When did they start installing wall to wall carpeting in B-17 Cockpits??!!??
<tongue in cheek>

Snuffy

Re: B-17 Enclosed Home Cockpit Project
Thanks Guys! I appreciate all the nice compliments and feedback!
Bill
Bill
Re: B-17 Enclosed Home Cockpit Project
The carpet is a scrap piece I had laying around that I use to keep my chair from rolling around on the wood base. It won't be there in the NG cockpit. I will be using a car seat built into a frame and base on a track.Snuffy wrote:<tongue in cheek> What I wanna know is ....
When did they start installing wall to wall carpeting in B-17 Cockpits??!!??
<tongue in cheek>
Bill
Re: B-17 Enclosed Home Cockpit Project
Hi Francois,altack wrote:Hi Bill,
About the air filter indication lights, what kind of LEDs are you using ? do you have a specific wiring diagram ?
BTW, eventually I should be able to make repros of the primer knob...
Regards,
Francois
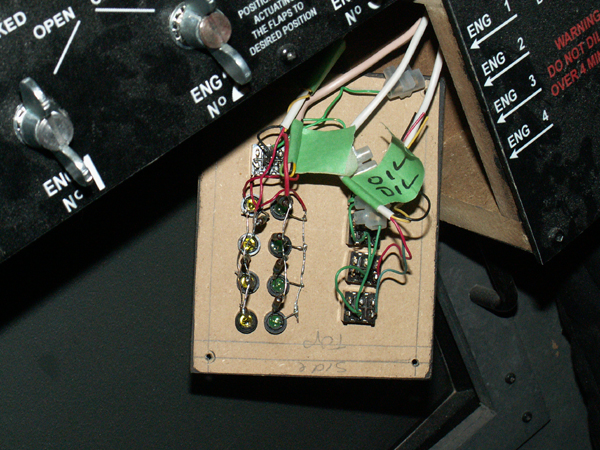
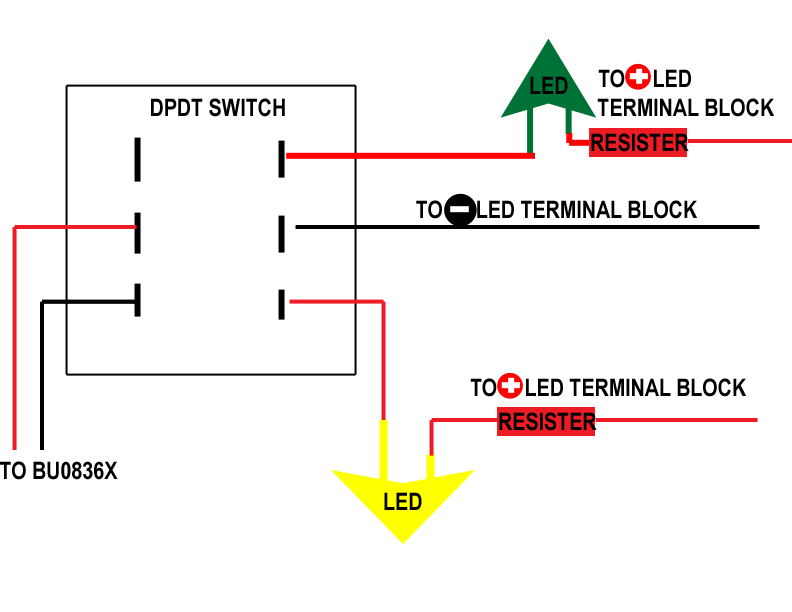
In my current cockpit, I am using standard 5mm LED's. Here is a crude copy of the wiring. The 4 LED's on each side are just connected together. They are connected to a terminal block which is in turn connected to a molex connector of a separate power supply.
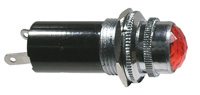
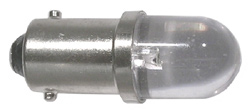
I will be using indicator Lamps with replacement LED Bulbs for the NG. I have amber and green on order now.
A repro of a primer knob sounds pretty cool! Sounds like you have something in the works for your project?
Bill
Last edited by boris4356 on 14 Nov 2015, 02:29, edited 1 time in total.
Re: B-17 Enclosed Home Cockpit Project
Great finding Bill,
would you have the indicator Lamps as well as the replacement LED Bulbs references so that I can try to find it "our" side of the pound ?
Do you believe the Leo Bodnard's BU0836 +5v output is sufficient enough to power 4 LED bulbs in a row ?
For the time being, I'm pilling up spare parts for my next summer project : "The B-17 Throttle project part II" (alias "the knob reproes strike back"), and I just found on Ebay a genuine Parker Primer alas I'm still looking for good fire handles reproes
Thanks for the wiring diagram, it is very usefull !
Regards,
Francois
Re: B-17 Enclosed Home Cockpit Project
Hi Francois,altack wrote:Great finding Bill,
would you have the indicator Lamps as well as the replacement LED Bulbs references so that I can try to find it "our" side of the pound ?
Do you believe the Leo Bodnard's BU0836 +5v output is sufficient enough to power 4 LED bulbs in a row ?
For the time being, I'm pilling up spare parts for my next summer project : "The B-17 Throttle project part II" (alias "the knob reproes strike back"), and I just found on Ebay a genuine Parker Primer alas I'm still looking for good fire handles reproes
Thanks for the wiring diagram, it is very usefull !
Regards,
Francois
I forgot to note on the diagram that the LED's are connected in parallel with a separate resistor for each one. To answer your question definitively about Leo Bodnard's BU0836 +5v output capability, I disconnected the LED's from my power supply terminal block, and connected them direct to the +5, and GND on my BU0836X. 4 LED's connected in parallel with a separate resistor for each one work fine.
Here is the link for the indicator Lamp holders and bulbs:
The main site: http://www.a1parts.ca/
The lamp holders: http://www.a1parts.ca/lamps/index.htm
T 3-1/4 (10mm) bayonet base, 55-343(Amber), 55-345(Green)
The bulbs: http://www.a1parts.ca/led/led.htm
T3 1/4 (10mm) Bayonet Base, 55-113W-0 White 120V AC/DC 2000 mcd 20 mA 130V Max
I made some progress on the Fire handle repros. Will post some details soon.
Looking forward to "The B-17 Throttle project part II"!
Bill
Re: B-17 Enclosed Home Cockpit Project
Well I finished my molds. I broke the original handle trying to get it out and I ended up having to cut the mold in half so that it wouldn't happen to the repros. I hold the mold together with rubber bands for the casting, and it seems to work alright.
I also made the molds a lot thicker than they needed to be, which wasted a lot of silicone and ended up costing a fortune! Now I know better if I ever make any other molds.
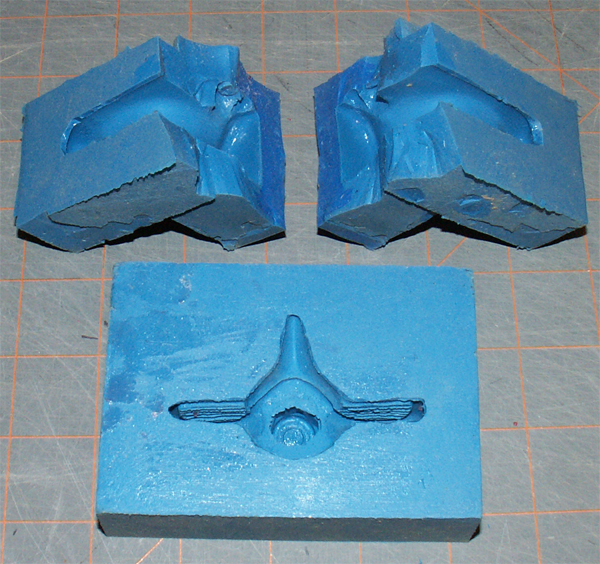
I used polyester casting resin. I used a red dye in the resin hoping that I would not have to paint them. If I had to do this over again, I would probably use epoxy instead of polyester. The handles have a lot of little bubbles, and stay tacky for quite a while. They do eventually cure completely though.
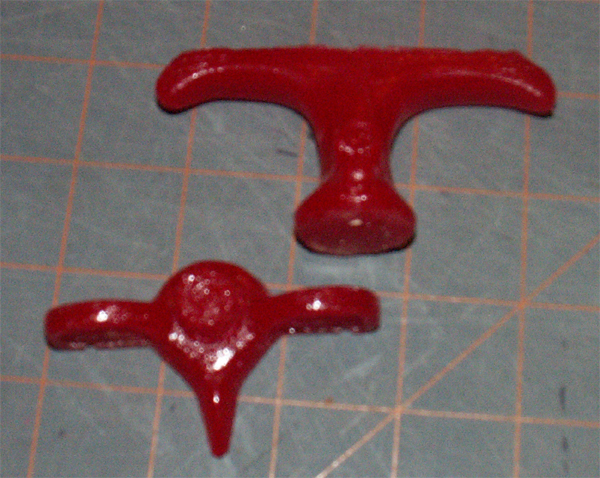
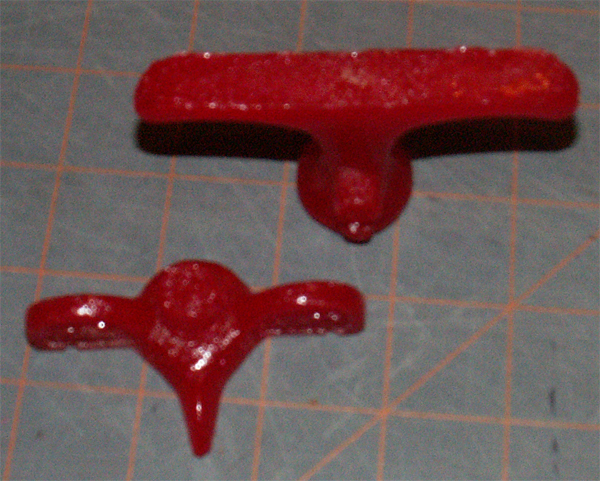
I didn't like the results at all, so I sanded them, and painted them with red plastic spray paint.
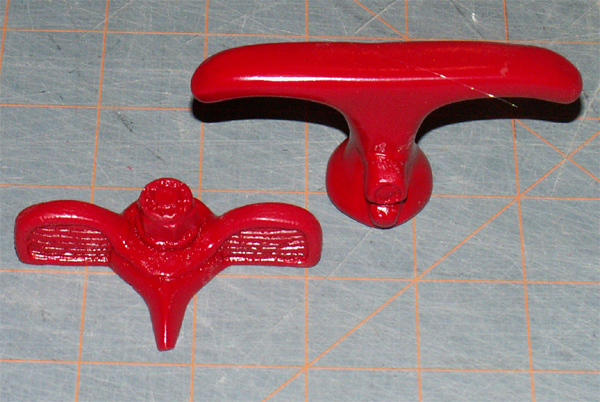
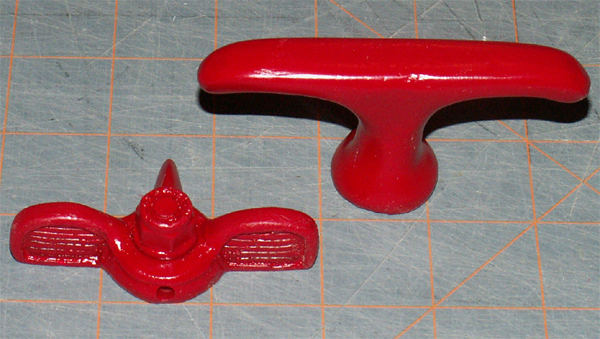

After painting, they look much better. I have 32 oz of the resin, so I will be making more trying different amounts of catalyst, and different pouring techniques to see if I can reduce the bubbles.
Next is to give them a trial run, and make sure they are up to the task.
Bill
I also made the molds a lot thicker than they needed to be, which wasted a lot of silicone and ended up costing a fortune! Now I know better if I ever make any other molds.
I used polyester casting resin. I used a red dye in the resin hoping that I would not have to paint them. If I had to do this over again, I would probably use epoxy instead of polyester. The handles have a lot of little bubbles, and stay tacky for quite a while. They do eventually cure completely though.
I didn't like the results at all, so I sanded them, and painted them with red plastic spray paint.
After painting, they look much better. I have 32 oz of the resin, so I will be making more trying different amounts of catalyst, and different pouring techniques to see if I can reduce the bubbles.
Next is to give them a trial run, and make sure they are up to the task.
Bill
Last edited by boris4356 on 14 Nov 2015, 02:36, edited 1 time in total.
-
Tako_Kichi

- BDG & A2A
- Posts: 2185
- Joined: 05 Jul 2006, 13:33
- Location: SW Ontario, Canada (ex-pat Brit)
Re: B-17 Enclosed Home Cockpit Project
Just a suggestion but if you have some sort of vibrating table (or can make one) and sit the mould on that after pouring the vibration should drive the bubbles to the top. Even sitting it on a washing machine on the spin cycle with an uneven load may do it.
Larry
E8400 Core2Duo 3 Ghz, 4 Gb DDR2 PC6400 RAM, GTX460 (1 Gb), Realtek HD O/B audio, XP Pro (SP3)
Saitek X52 HOTAS, Saitek Yoke/Throttle, Saitek Rudder Pedals, TIR 5 Pro, LG 22" WS LCD, B-K Gamer
E8400 Core2Duo 3 Ghz, 4 Gb DDR2 PC6400 RAM, GTX460 (1 Gb), Realtek HD O/B audio, XP Pro (SP3)
Saitek X52 HOTAS, Saitek Yoke/Throttle, Saitek Rudder Pedals, TIR 5 Pro, LG 22" WS LCD, B-K Gamer
Re: B-17 Enclosed Home Cockpit Project
Great idea! I'll give that a try.Tako_Kichi wrote:Just a suggestion but if you have some sort of vibrating table (or can make one) and sit the mould on that after pouring the vibration should drive the bubbles to the top. Even sitting it on a washing machine on the spin cycle with an uneven load may do it.
Thanks,
Bill
Re: B-17 Enclosed Home Cockpit Project
Hi Bill,
I guess that's the usual trial & error path.
Anyway your final pictures are looking very good and very promising.
I'm eager to get your trial run results.
Considering my own experience it sure is strong enough for simulation purpose.
Let us know.
Regards,
Francois
I guess that's the usual trial & error path.
Anyway your final pictures are looking very good and very promising.
I'm eager to get your trial run results.
Considering my own experience it sure is strong enough for simulation purpose.
Let us know.
Regards,
Francois
Re: B-17 Enclosed Home Cockpit Project
Thanks Francois!altack wrote:Hi Bill,
I guess that's the usual trial & error path.
Anyway your final pictures are looking very good and very promising.
I'm eager to get your trial run results.
Considering my own experience it sure is strong enough for simulation purpose.
Let us know.
Regards,
Francois
If all goes well, I should be able to get some repros sent to you soon.
Bill
Re: B-17 Enclosed Home Cockpit Project
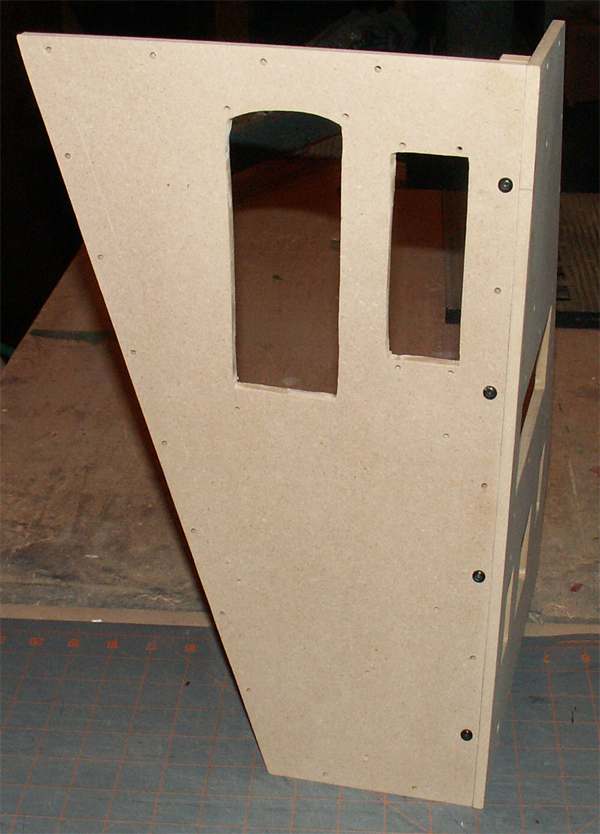
Work has been progressing on my co-pilot panel. I decided to bring it close to a stage of completion, as I need the rough dimensions in order to plan the interior and shell of the NG cockpit. The panel plates are the final product, but the panel housing is subject to change. The housing is easy to re-do. The panel plates are modular, and I can move them around as required.
I made the panel plates first, as there is not a lot of flexibility in their size and proportion in order to get them reasonably close to reality. I then made the panel housing. The right side of the front housing is at a 25 degree angle, as that will be the slope of the side of the cockpit shell.
The left side of the interior housing is at a 15 degree angle, in order to fit flush against my 42" monitor. The monitor will be the main instrument panel, and has to be canted at a 15 degree angle in order to be able to view properly looking down.
I screwed the panel plates in place to make a template for the switch body holes.
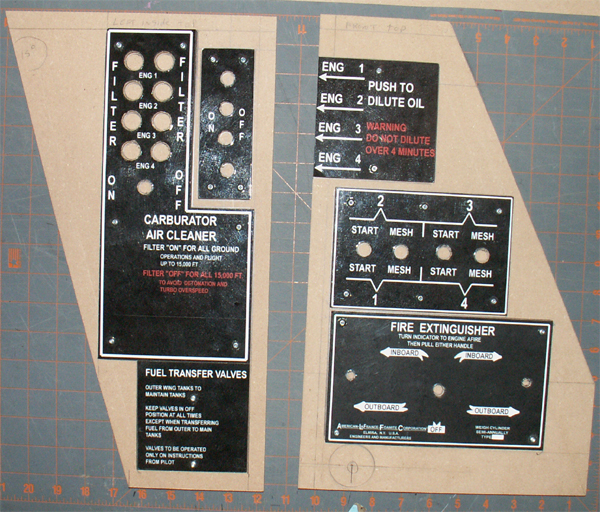
Then I cut out the switch body holes, and connected the two panel housings with a half inch strip.
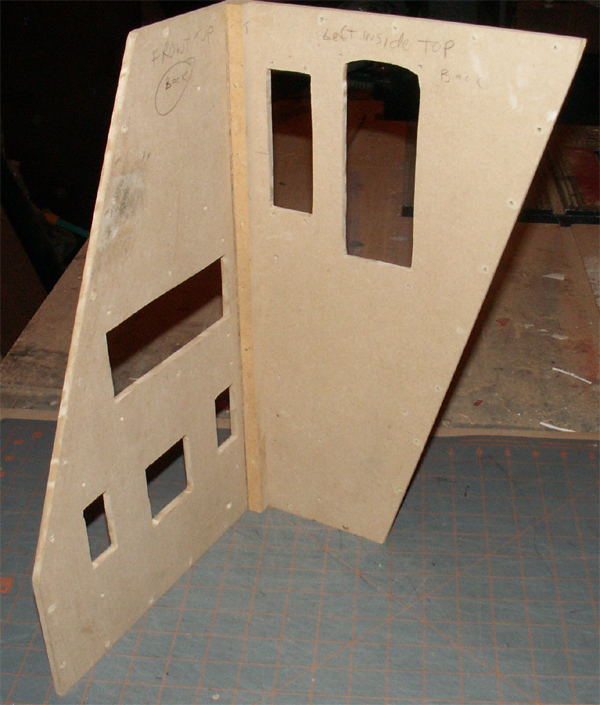
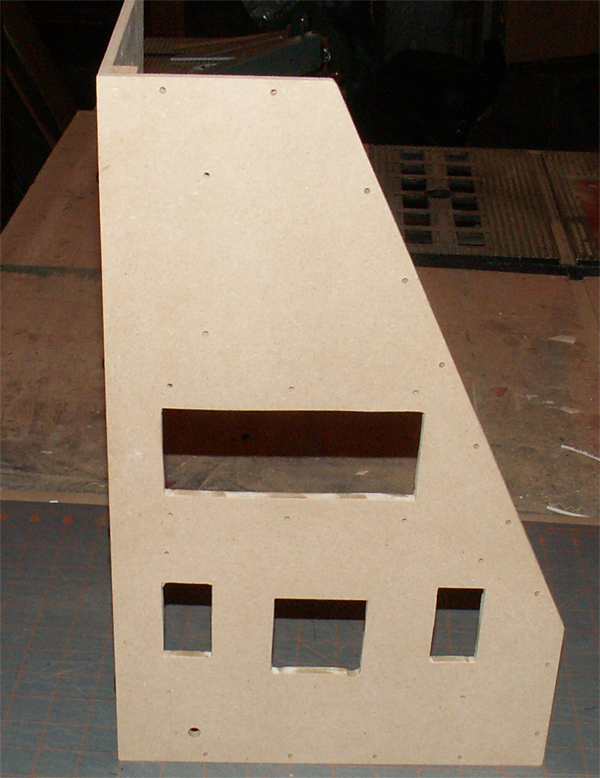
Painted housing Panels
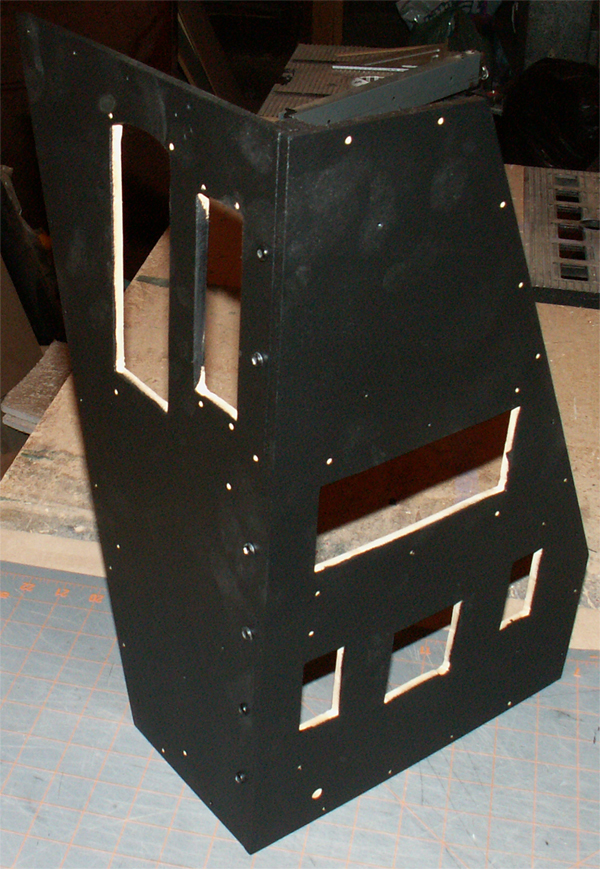
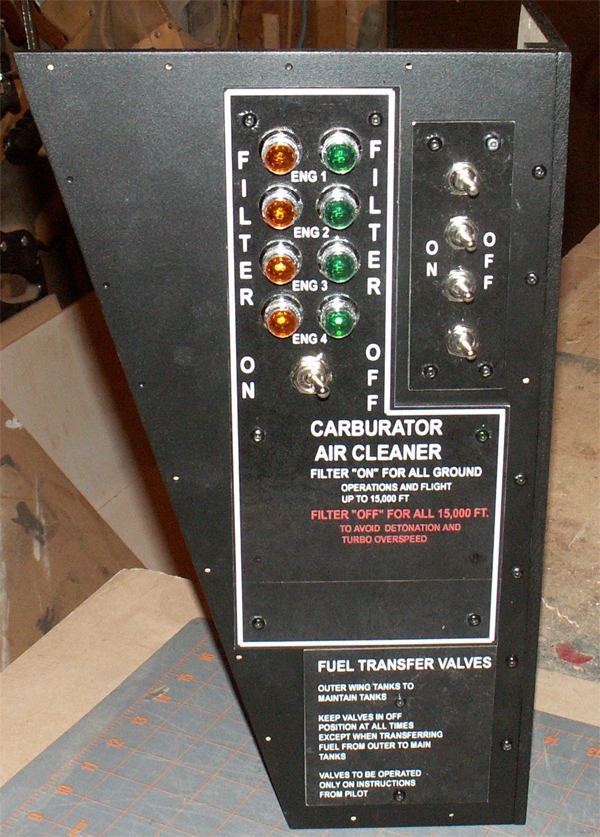
Interior housing with installed switches and lights.
Next is to install the switches and handles on the front housing.
Bill
I made the panel plates first, as there is not a lot of flexibility in their size and proportion in order to get them reasonably close to reality. I then made the panel housing. The right side of the front housing is at a 25 degree angle, as that will be the slope of the side of the cockpit shell.
The left side of the interior housing is at a 15 degree angle, in order to fit flush against my 42" monitor. The monitor will be the main instrument panel, and has to be canted at a 15 degree angle in order to be able to view properly looking down.
I screwed the panel plates in place to make a template for the switch body holes.
Then I cut out the switch body holes, and connected the two panel housings with a half inch strip.
Painted housing Panels
Interior housing with installed switches and lights.
Next is to install the switches and handles on the front housing.
Bill
Last edited by boris4356 on 14 Nov 2015, 02:46, edited 1 time in total.
-
Lewis - A2A
- A2A Lieutenant Colonel
- Posts: 33318
- Joined: 06 Nov 2004, 23:22
- Location: Norfolk UK
- Contact:
Re: B-17 Enclosed Home Cockpit Project
WOW
A2A Facebook for news live to your social media newsfeed
A2A Youtube because a video can say a thousand screenshots,..
A2A Simulations Twitter for news live to your social media newsfeed
A2A Simulations Community Discord for voice/text chat
A2A Youtube because a video can say a thousand screenshots,..
A2A Simulations Twitter for news live to your social media newsfeed
A2A Simulations Community Discord for voice/text chat

Re: B-17 Enclosed Home Cockpit Project
You can say that again!Lewis - A2A wrote:WOW
Who is online
Users browsing this forum: No registered users and 16 guests