I've trawled the forums for answers, and found they were all over the place. I have now put them all together in this one place in the hope that it could be a sticky for future pilots of this wonderful aircraft.
The areas that I feel needed to be made clearer are as follows: Taxiing the aircraft without causing damage. Navigation and use of the Map. And lastly the C1 Autopilot. My intension is copy other peoples posts (full credit given), and where I can't copy, rewrite where I can.
Taxiing the Aircraft:
Scott - A2A wrote:The real b-17 uses both throttle and differential braking to taxi, but if you only have a single throttle, you should be able to taxi pretty well with just differential braking. Just make sure you are moving before applying the differential brakes.
Scott.
some1 - A2A wrote:You can also use the joystick configurator utility to control assymetric thrust. Assign keyboard buttons to four 'Select Engine #' shortcuts. For example use '1', '2', '3' and '4' keys to select respective engines and '5' to select all engines. Then in the sim press simultaneously '1' and '2' to control starboard engines with your throttle and '3' and '4' to control port engines only. Press '5' to regain control over all engines.
If you have split throttle with two independent levers, you can also use the joystick configurator utility to assin port engines to one axis on your joystick and starboard engines to another.
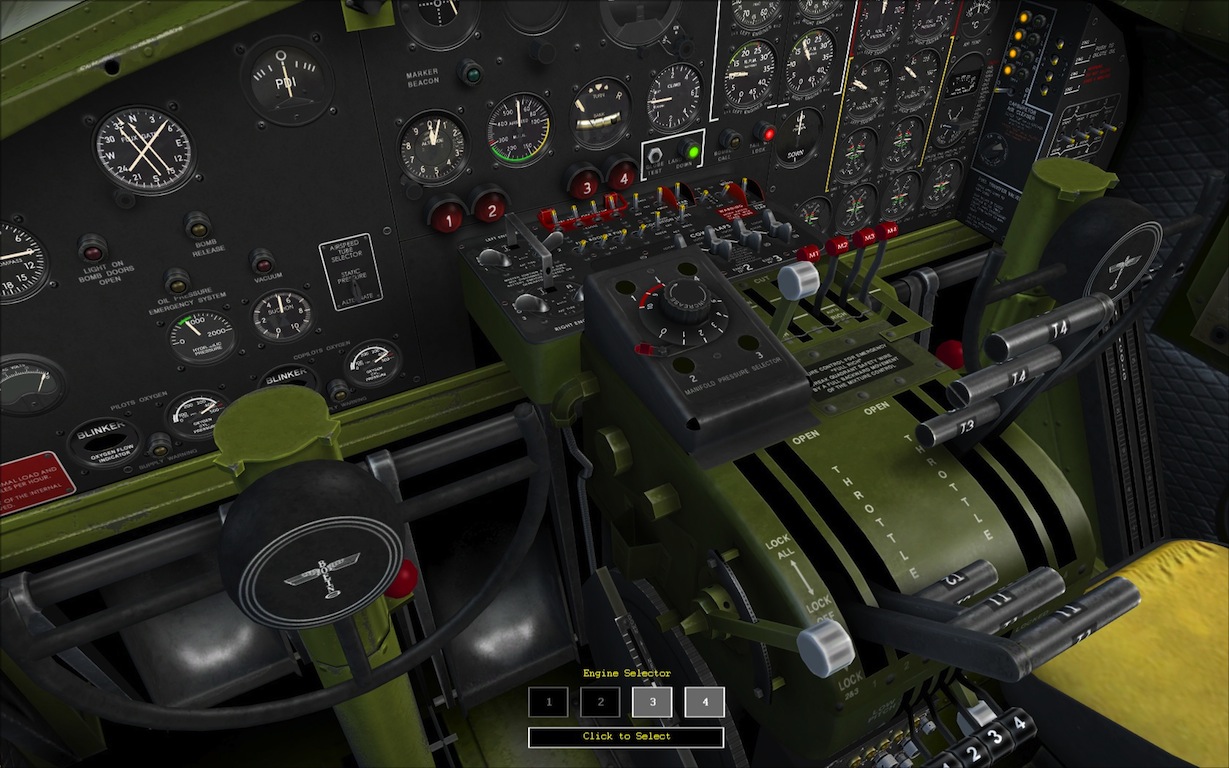
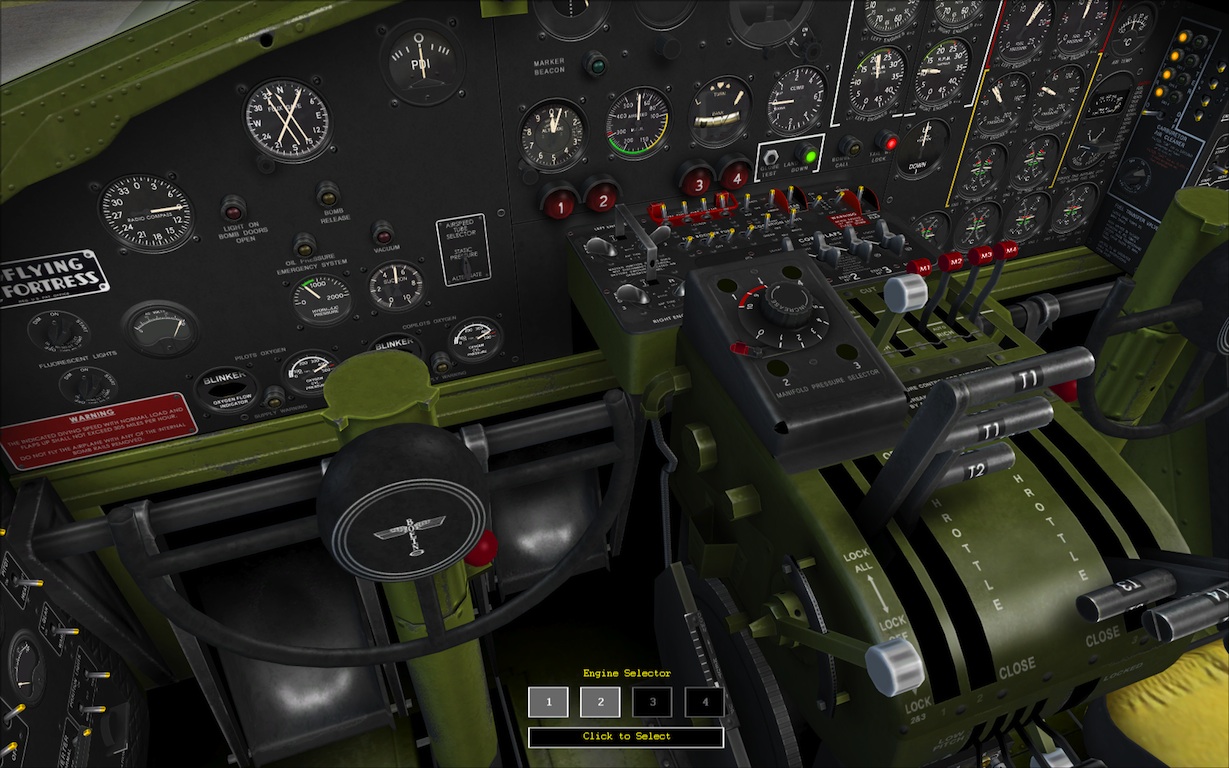
Three methods of taxiing the B-17. Personally I find the last method the easiest. I bring up the throttle menu (shiftflyboy4612 wrote:I found a menu that pops up that lets you quickly select which engines you want to throttle up/down. I think it's Shift+8. Then you just click on any combination of 1, 2, 3, or 4 and away you go. I've got a single engine throttle but this little pop up menu works well for me.
The first picture below shows a left turn on taxi, the second picture shows a right turn. I didn't even use brakes in this instance.
Navigation and use of the Map:
dopey419th wrote:Here's the image via photobucket...hopefully.

Above is a picture of the A2A Map, it shows the information quoted from MustanGrande. But what of VOR and NDB?MustanGrande wrote:Your heading bug is set to 180 degrees. Your magnetic heading is roughly 173 degrees. You have a tailwind or slight crosswind from the right, so your actual course is roughly 164 degrees, due to drift.
Looking at the picture above, you can see that the VOR with the frequency 113.700 is at your 090 relative position. To fly to the VOR you would turn right until the needle points to the 0 (zero), the VOR will be directly in front of you. Change your heading to keep it there to fly to it. If you want to fly away from the VOR turn so your needle points to 180. Obviously if you want to fly an arc keep the needle in this picture at the 090 position. If you chose an NDB you would click the spot next to the ADF 1 radio. The frequency shown is 278.500, and for arguments sake lets say that NDB is directly to your left side. The needle will point to 270. Again just turn your aircraft so the needle is pointing at the 0 (zero), and you will be flying towards the NDB. Adjust heading accordingly.VulcanB2 wrote:Hi,
You can fly the B-17 that way. You need to use the pop-up panel to tune the radios (this would be done by the nav officer). Click to the left of the desired radio to set the source for the radio compass.
After that, treat the radio compass as an RBI (Radio Bearing Indicator) and you're good to go!
Best regards,
Robin.

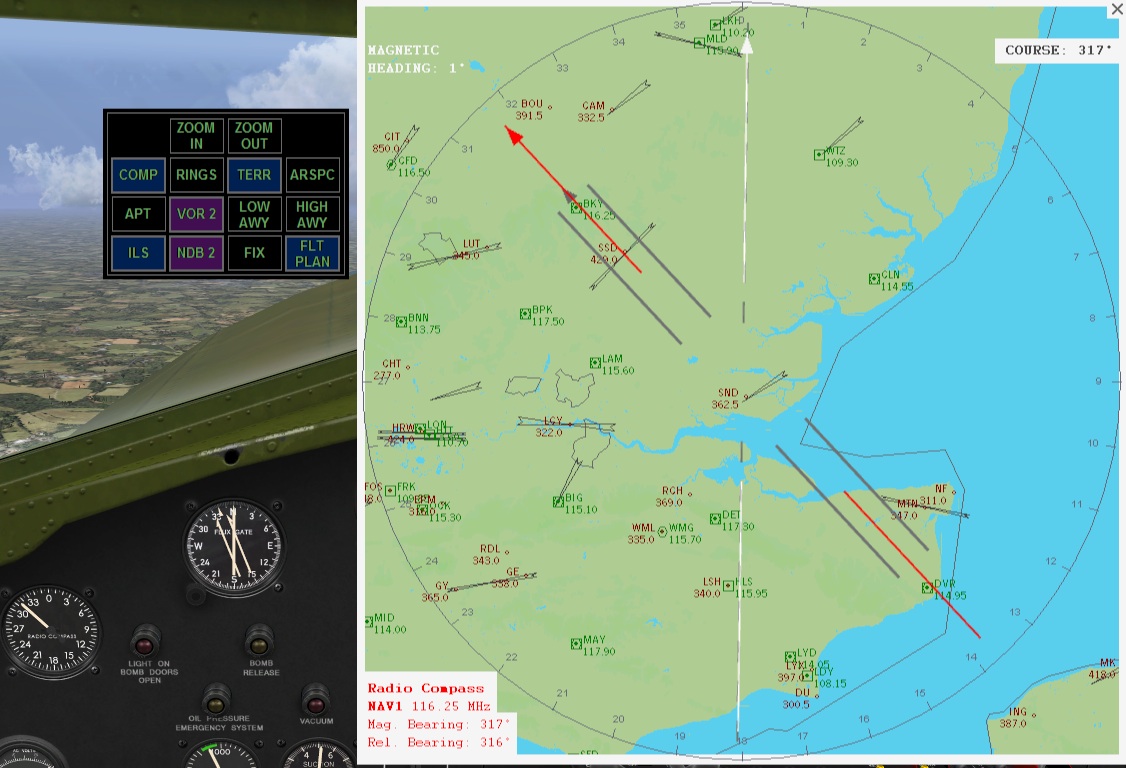
To further demonstrate, the picture below shows the radio compass pointing to the VOR (BKY) frequency 116.25. Looking on the map in the bottom left corner you'll see the frequency, magnetic bearing, and relative bearing. The red arrow on the map points to the VOR's or NDB's. In this case the VOR is on a bearing 316 relative to my position. My heading is of course 000, or North. My coarse is set at 317 degrees. If I wanted to fly to that VOR I would turn left to a heading of 317 degrees and match my set coarse.
In the next picture I am using an NDB instead, but the principles are the same.
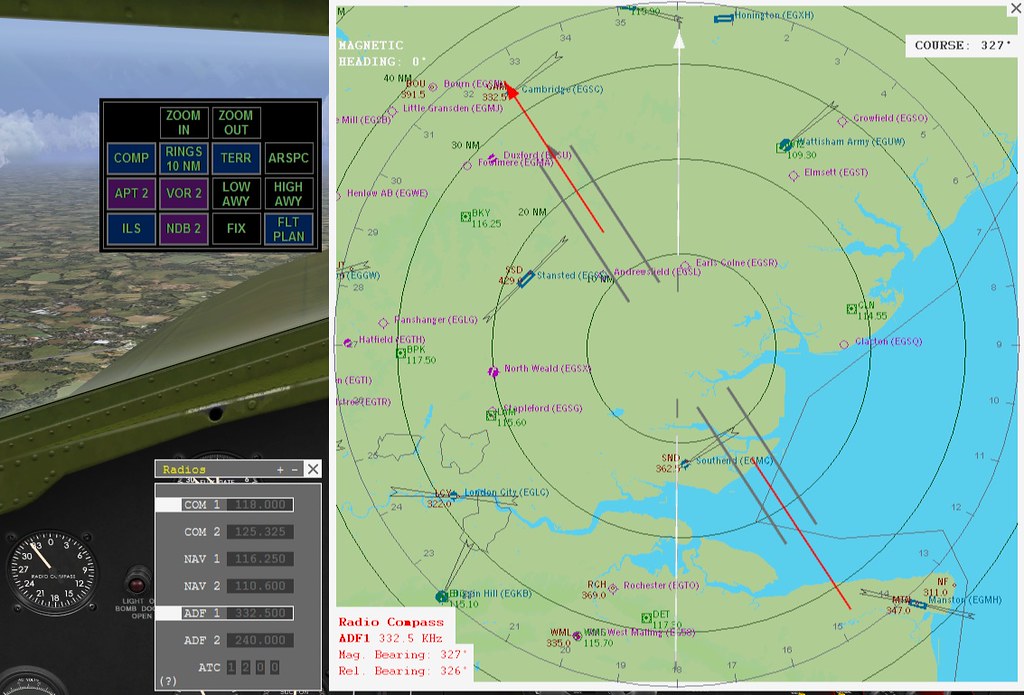
The NDB frequency is 332.500 and the needle is pointing to the CAM NDB at 326 relative. Please note with proper use of the Map, you can gather a wealth of information, names, frequencies, distances etc.
Lastly I would quote this post by Mattgn, thanks Matt.
The C1 Autopilot:
mattgn wrote:The following is a familiarisation tutorial I wrote for the 91st Bombardment Group online squadon. Hopefully it will answer all your questions on the C-1 AP. If it doesn't let me know, and I'll try and answer your questions as best I can.
C-1 Autopilot Guide 101.
This autopilot is actually very simple to use, although it looks complicated at first. Once you start messing around with it, you'll realise how easy it is to use.
First off, there are 2 parts to the C-1 Autopilot (ap): the ap panel itself, with twiddly knobs and flashy light things, and the Pilots Directional Indicator (PDI) located just to the right of the Flux Gate (compass) on the pilots dash.
Familiarisation of the C-1:
Left hand side toggle switches: the top switch "MSTR" which is "gated" to the Stab switch are the master switches. If you flick that over to the right, it powers up the unit but does not take control of any of the control surfaces. Below that is the Aileron switch, and until you flick that over to the "On" (right) position, the AP will not control ailerons, same with the rudder and elevator switches. All 3 need to be moved over to the right in order to pass those control surfaces over to the ap. The bottom switch couples the PDI to the ap, which I'll explain very shortly.
The lights along the top are indicator lights which, when on, tell you that the ap is moving those control surfaces in order to achieve what you're telling it to do. The on off switch to the right of the lights turns the indicators on and off.
Top 3 rotating knobs labelled "To Lower R.Wing, If PDI Right, and To Raise Nose" are the controls to use to neutralise the control surfaces in a particular position. For example, you will use the "To Raise Nose" a lot, because that's the control that controls your elevators.
Example : With the ap on and all toggle switches to the right, we want to initiate and hold a 1000fpm climb. We rotate the "To raise nose" knob to the right, and the nose goes up, we continue to rotate that knob until the A/C settles at our desired vertical speed (VS). When the ap has the elevator in the correct position that you have set it with the "To raise nose" knob, the indicator light will extinguish, telling you that the ap is happy as a pig in poop about where it's at with the world.
If you wanted to maintain a constant 10 deg bank to the left, you could move the "To lower R. wing" knob to the left, and keep going until you were happy that the ap was holding your deg of bank for you. The "If PDI Right" does the same thing with your rudder.
2nd row of rotating knobs are for Sensitivity, which as any good lady will tell you is what all women want.
These affect how control inputs are made by your ap in order to carry out your orders. For example, it's a bit turbulent, the planes bucking this way and that. If you have the sensitivity set too high, the ap will go bananas trying to do it's thing, because it's making all these tiny little corrections to elevators, ailerons etc. It's a Catch 22 of course, because higher sens' values will provide more precision, but lower values will result in sluggish behaviour. Find the balance before you shake your baby to bits.
3rd Row of rotating knobs "Ratio".
These boys decide how much throw your ap puts into the control surfaces when adjusting for a deviation, as in turbulence etc. Too much will cause excessive control surface movement, too little and the ap will be there all day trying to get your wings level.
4th Row "Turn Compensation".
This is where you trim the ap for turns, it's that simple. When you order a turn, you can adjust these knobs so that your turn is at the AOB that you want, that the rudder is co-ordinated, and that you maintain altitude throughout the turn.
For example: We order a left turn, the AOB is too shallow, the turn and slip bubble is way out of centre, and the A/C leaps into a 500fpm climb. We increase the "Increase Bank" knob until we're happy with the AOB, we increase or decrease the "To Decrease Skid" knob until the Turn and Slip bubble is centered throughout the turn, EDIT!!!(found to work in conjunction with the Rudder setting in the "Ratio" settings) and we reduce the "Up Elev." until we're sat in our turn with our VSI at zero.
How To TURN !!
3 ways to do this.
First, and easiest, is to have all toggle switches On (right) and click "Centre" on the "HOLD PDI (OFF)" text at the bottom right. The A/C will bank initially, then level it's wings. Then click "right" or "left" in the same text area. The PDI needle will swing in whichever direction you've ordered a turn and the A/C will follow it. Then when your desired heading is about to be reached, click "Centre". That's it.
2nd way, set the "HOLD HEADING (OFF)" figure until your desired heading figure shows up, then click "HOLD HEADING (OFF)" and it will switch on, and turn to your heading that you set.
EDIT!!!3rd, use the "Turn Control" in the very top left of the panel. You can initiate turns with the "HOLD PDI (ON)" on, as it overides the PDI command.
I've now tuned my C-1 AP for Rate 1 Turns, and have had good success with timings for 180 deg turns anywhere between 57 and 63 seconds, and a full 360 deg turn anywhere between 1:57 and 2:03, depending on the weather of course, so pretty close.
Now the C-1 applies rudder very slowly, no matter what the C-1 AP settings are at, e.g. Sensitivity, Ratio etc. So what you will find is that the start of the turn is very sloppy, i.e. lots of sideslip, then expect too much rudder before the turn settles into a nicely coordinated Rate 1 after about 15 to 20 seconds.
I have attempted to erase the initial sideslip with increased ratio, however all that does is gives too much rudder during the "settled" phase of the turn, once the AP has moved the control surfaces to where you've ordered them to be.
So the initial sideslip and un-coordinated flight at the start of the turns is something that we'll have to live with, unless I can find someone to shed light on increasing the actual speed the AP moves the rudder controls (when you order a turn, just take note of how slowly the rudder pedals move in relation to the other controls) and to quote from the pilots notes for the Fortress "The controls are quick in response and effective: the ailerons are reasonably light, the elevator slightly heavy, and the rudder extremely heavy." Perhaps that is why the AP takes a decade to move the thing...!
IMPORTANT: The settings you tune your C-1 AP to for a rate 1 turn at 150mph, will NOT provide the same coordination and turn rate at higher airspeeds, so you'll have to adjust the settings, i.e. lower settings for high cruise speeds etc.
I have added my C-1 AP settings here, so you can plug the numbers into your C-1 and see what you think. These settings are for a trimmed A/C at 150mph and will maintain current altitude (depending on weather like I said).
From top row to bottom row reading left to right:
Aileron Centering Knob: 0%
Rudder Centering Knob: 0%
Elevator Centering Knob: 25%
Aileron Sensitivity Knob: 40%
Rudder Sensitivity Knob: 64%
Elevator Sensitivity Knob: 40%
Aileron Ratio Knob: 45%
Rudder Ratio Knob: 27%
Elevator Ratio Knob: 15%
Aileron Turn Compensation Knob: 35%
Rudder Turn Compensation Knob: 9%
Elevator Turn Compensation Knob: -50% (minus 50%)
It's by far not an exact science, as when you start to play with one setting, it affects something else. So trial and error is the way forward folks.
I am going to try the AP whilst in formation and see just how dangerous the initial sloppiness of the turns is in relation to maintaining position.
Smoke me a kipper, I'll be back for breakfast.
Regards
Matt
Thank you to everyone I have quoted in this article, your help is greatly appreciated. I have put this together to simply keep these methods in one place. Hopefully it will help new pilots get to grips with a few difficulties I and others have had. If the forum gods see fit, it would be nice to sticky this, or if it's not of good enough quality, write something similar maybe?